Friday, July 31, 2009

Sushi Cupcakes!

Oh man, I have been talking about making these forever! I finally got around to it...thanks in part to the fact that Jeff is having a sushi party tomorrow night, so that gave me the perfect excuse.

I am not going into the baking part/recipe for these. They are just a basic white cake with a basic vanilla frosting. Now for the pictures!!!

Here are all of the cupcakes together (yes, i only made 7 because i ran out of fondant...more on that later):


Here are some kind of a sushi roll (feel free to use your imagination)....it's black fondant in the place of seaweed, twizzlers, gummy worms, and other candy as the fish, and nonpareils as the rice:


And here is another "roll" featuring jelly beans in the place of roe and, again, black fondant for seaweed:


Last but not least, the sashimi...too funny. It's just a swedish fish tied on with a small piece of black fondant as the seaweed...although I am sure you figured that out by now.


So, I had intended to make 2 dozen sushi cupcakes, but I ran out of fondant after 7 cupcakes mostly because I bought the pre-made kind and half of it was dry and cracked....lame. Oh well, 7 is better than none. And there are still 2 dozen cupcakes, it's just that the 17 that aren't shown do not resemble sushi whatsoever.

This was my first foray into fondant and although I bought the pre-made kind, I would have to say it went pretty well. Next time I'll try making it myself! It is safe to say that my rolling pin has made his way back into my good graces :)

Makes me want to eat real sushi!!

Monday, June 22, 2009

Baby Shower Cupcakes (Lemon Sunshine)


My very first paying cupcake job!!! One of my very best ladies asked me to bake cupcakes for a baby shower the she and her mom were throwing. The theme was surfer boy using the colors blue and orange.
The cupcakes themselves are lemon flavored and I took a little help from a box because I had so little time to put these together. However, I did not follow the directions on the box. Instead I did this:

Ingredients

1 package lemon cake mix
1 cup sour cream
3/4 cup water
3/4 cup oil
4 eggs
1 small package lemon instant pudding

Mix dry ingredients. Add wet ingredients. Mix with electric mixer on medium speed for about two minutes. Use a strong mixer, this batter is thick. (I used my stand mixer, Pearl). Bake cupcakes at 350 degrees for 20 minutes (I was able to get 24 very full cupcakes from the recipe). For regular cake, pour into a greased 9x11 pan or two round pans. Bake at 350 degrees for 25-30 minutes. Don't over bake or the cake will be too dry! The toothpick test works to check to see if they're done. I doubled the recipe and then I simply piped on a simple a lemon cream cheese frosting. I didn't get to taste them, but rumor has it that they were delicious!!! Here's some pics from the party:


Lemon Meringue Pie


Yeah, so it has been a while since I posted. I have been baking, I just haven't had the time to update my blog. Either that or it's just plain laziness. It's your call. I don't really make pie, but I woke up one morning and had a craving for marshmallow fluff...weird, I know, but I just had to have it. I couldn't find any recipes that called for marshmallow fluff that sounded even remotely appetizing to me. Hence, the meringue pie...I added the marshmallow to the meringue and it was soooooo freaking good!!! It was fabulously delicious! Here's the recipe: Ingredients

1 1/2 c. sugar
6 T. cornstarch
1/4 tsp. salt
1/2 c. freshly squeezed lemon juice
1/2 c. cold water
3 eggs yolks, slightly beaten
1 1/2 c. boiling water
1 T. butter or margarine
9-inch baked pie shell
Fluff Meringue (below)

Directions

1. In medium saucepan combine sugar, cornstarch and salt.
2. Add lemon juice, cold water and egg yolks; stir in boiling water.
3. Cook over medium heat, stirring constantly, until mixture begins to
boil. Cook 2 to 3 minutes more.
4. Stir in butter until melted. Remove from heat.
5. Heat oven to 350° F and Prepare fluff meringue (see below)
6. Pour filling into pie shell.
7. Spread meringue over hot filling; seal well to crust.
8. Bake 10 to 12 minutes or until meringue is golden. Cool completely on wire rack.

Fluff Meringue

1. In medium bowl beat 3 egg whites, at room temperature, until
soft peaks form.
2. Beat in 1/2 c. Marshmallow Fluff, a little at a time, until whites stand in stiff glossy peaks.


Makes me wish I had a slice right now. Therein lies the danger of posting recipes weeks after you actually made them....

Wednesday, May 20, 2009

ApronDance

So, while I didn't exactly bake these, I still MADE them. I think that makes them fair blog fodder. For those of you who don't know what the apron dance is, do your research. It should be a lot of fun and as the maid of honor and matron of honor, Kasey and I (respectively) get both the pleasure and privilege of wearing the aprons during the dance. So, to all of you who will be attending Jackie and Tim's nuptials, bring your dollar bills...or $5's, $10's, etc... It's like a strip club where we all keep our clothes on.

Anyway, I decided to make the aprons for them so that they would have them forever as a keepsake from their wedding. Plus, Jackie and Tim love to cook together so it seems appropriate.

The soon-to-be newlyweds in their brand new aprons:


Tim's seems to fit perfectly and I sincerely hope the pattern isn't too feminine. I thought it was fun and funky. And obviously Jackie's is yellow and covered in lemons (in case you can't tell). Hers was a little too big so I made it smaller at the top, however that is not reflected in this picture.

I hope they like them and I hope the apron pockets get filled to the brim with cash for their honeymoon!!!

Monday, May 4, 2009

Rainbow Cupcakes with Fluffy White Clouds on Top


These were definitely an experiment, but A LOT of fun to make! I used the same basic vanilla cupcake recipe as usual, but this time I added some fun colors to the mix. After making the batter, I divided it evenly into 6 different bowls and then dyed each one a color of the rainbow.

Starting with red, I spooned each color evenly into individual cupcake liners.

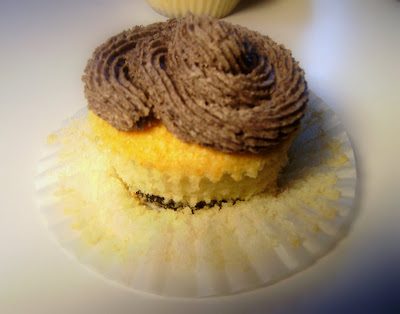
Bake the cupcakes at 375 degrees for about 20 minutes. When they are finished baking ALLOW THEM TO COOL IN THE PAN FOR 10 MINUTES. I write that in all caps because I learned the importance of this valuable lesson today. Typically when baking cupcakes, I blindly follow this direction, no questions asked. Today, however, impatience got the best of me and I immediately transferred the cupcakes to the cooling rack upon removing them from the oven. Much to my chagrin the paper liners separated from the cake itself, which really isn't a huge problem--it just makes for less cute finished products.

Here is what they looked like after baking:


Then I iced them with a basic vanilla buttercream frosting, but I whipped it for extra long so that I could pretend that is was a fluffy white cloud atop a funny looking rainbow.


They looked so irresistible that I could barely wait to taste one. The cake was exquisite and the frosting, while good, was a tad bit sweet....but I ate it all gone anyway.

Going.....

Going.....

Gone.....


Oh, and on a side note...my darling husband got me a GREAT birthday present! He bought this little lighting kit so that I can take better pictures of my creations. Normally I rig a similar set up on my floor right in front of the sliding glass door so as to get the most natural light as possible. Sometimes it works, sometimes it doesn't. Now I never have to worry about at because he bought me one of these:


Best husband I ever had. Love him!! Thanks darlin'.....

Thursday, April 23, 2009

Cookies and Cream Cupcakes


The truth is that I love all things cookies and cream, so I have been dying to make cookies and cream cupcakes. However, I am not a huge fan of super sweet desserts so I decided to compromise my desire with my non-sweet tooth and made vanilla cupcakes with cookies and cream frosting. The results are fantastic and these might just be the best cupcakes I have ever made. Seriously.

For the cupcakes themselves, I opted to try Amy Sedaris' recipe for Vanilla Cupcakes from her book I Like You: Hospitality Under the Influence which Kate Mac gifted to me a few Christmases ago--just to be clear, it wasn't a Christmas present, just a gift she happened to give to me around Christmas. She would want me to clarify that....

Here is the recipe as quoted from Amy Sedaris' book:

Turn oven on to 375 degrees F.
You will need:


Unsalted butter, sugar, eggs, vanilla extract, baking powder, salt, flour, milk

Put 1 1/2 sticks of butter in a mixer and beat at medium speed until somewhat smooth. Pour in 1 1/2 cups of sugar and beat well. Add 2 eggs. I like to crack the eggs on the side of the bowl while it is moving, which can really be stupid. I like to take chances. Yes, I have had to throw away my batter because I lost eggshells in the mix. Yes, it was a waste of food and yes, I know how expensive butter is, but what can I say? I'm a daredevil. Mix well. Add: 2 teaspoons of pure vanilla, 2 1/2 teaspoons of baking powder, 1/4 teaspoon salt, 2 1/2 cups of flour, and 1 1/4 cups of milk. Beat until it looks like it is supposed to and pour into individual baking cups, until they are about 2/3rds full. Bake for 20 minutes or until golden brown. Should produce 24 cupcakes; I get 18 because I am doing something wrong, although my cupcakes were voted 2nd best by New York Magazine.

Back to me (Jenn) now...This recipe is freakin' fantastic! Best vanilla cupcakes I have EVER had! Moist, fluffy, and delicious. Highly recommended...not to toot my own horn or anything...

Oh! and to add my own touch, I twisted a cookie in half and placed the side that got all the cream in the bottom of each paper cupcake liner (cream side up). Does that make sense? This way each cupcake had an Oreo "crust" of sorts.

For the frosting I whipped up a basic vanilla buttercream (one box confectioners sugar, one stick unsalted butter, one teaspoon vanilla, and 1/4 cup milk--whip it good). Then I added 15 food-processed Oreo cookies and mixed them in really well.

I decorated half of them with 1/2 a cookie stuck in the icing on top, but didn't like the way it looked. I prefer simple. So I opted not to photograph those specific cupcakes.

Anyway...you must try these cupcakes. End of story.


(you can kind of see the oreo cookie at the bottom)

Tuesday, April 14, 2009

Easter Basket Cupcakes


Unfortunately the only people that enjoyed these cupcakes were Tim's coworkers. We were supposed to go to my Grandmom's for Easter, but I woke up and just wasn't feeling well so we had to call out of Easter. It saddened me to do so, but I really wasn't feeling up to it and contrary to the rumors that my Grandmom was spreading, it is NOT because I am pregnant. Haha--I know she was just joking or it was wishful thinking. Either way, that isn't the case.

So, after we cleared that up Tim and I spent Easter Sunday lazing around, watching Slumdog Millionaire, and eating Burger King because it was the only place open. All in all it wasn't a bad day and I sent the 2 dozen leftover cupcakes to work with Tim so that they wouldn't go to waste. I sincerely hope that the boys at DCP enjoyed my hard work.

In all honesty, these were actually very easy to make. I am not posting the recipe for the white cake because if you read this blog, then by now you know where to find a good recipe for cake from scratch. And these were more about the decorating than the baking.

(photo courtesy of the darlin' husband)

1. After baking the cupcakes and letting them cool completely, begin the decorating process by piping on green icing to look like grass. I used Wilton tip #233 and it came out like this:


2. Then take a Twizzler and bend it in half. Stick it as far into the cupcake as it will go in order to resemble a basket handle.

(sorry--the stupid flash washed out the pretty green color)

3. Finally, fill the "basket" with a few jellybeans, which should stick to the icing like glue.

(again with the washed out green color...)

Here are a few pictures of the final product displayed on the cupcake tree we received from Cat Kochanski as a wedding gift. Thanks Cathy!!!!


I kind of wish I had used black licorice instead. It probably would have looked cuter, but I detest the taste of licorice...oh well.

Tuesday, April 7, 2009

Jackie's Mexican Cheesecake Bars

For quite some time I have been talking about Jackie guest blogging for me. Well that time has finally arrived! She is a great cook, but not a huge fan of baking despite the fact that everything she bakes is met with fabulous reviews. The following is straight from the lovely redhead herself:

I made these for a little boy named Donnie, who recently turned one. He had a Mexican fiesta party and his mom asked me to make a dessert. I am NOT a baker, but wanted to contribute something. So I found this recipe and altered it slightly. Little Donnie was too young to enjoy them, but the rest of the party loved them. I didn't even get a chance to taste them for myself. But I am making them for my mother-in-law-to-be's birthday. I hope you enjoy!

Ingredients

2 (8 ounce) pkgs. cream cheese softened
1 Cup sugar
1 tsp. vanilla extract
2 (8 ounce) pkgs crescent rolls
3/4 cup sugar
1 tsp ground cinnamon
1/2 cup butter

Directions

1. Spray 9 X 13 baking dish with cooking spray. Preheat oven to 350 degrees.

2. Beat cream cheese, 1 cup sugar, and vanilla until combined.


3. Unroll 1 pkg. crescent rolls and shape to bottom of baking dish. (You may need to use a rolling pin and flour.)

4. Spread cream cheese mixture evenly onto crescent roll layer.


5. Top cream cheese mixture with 2ND crescent roll layer.

6. Combine 3/4 cup sugar, cinnamon, and 1/2 cup sugar. (I used my hands just for fun.)

7. Dot sugar mixture on the the crescent roll layer.


8. Bake for 35 minutes or until crescent roll is golden brown.

Makes 12 cream cheese bars.

Back to me (Jenn) now...Unfortunately, I didn't have a chance to try one of these. Apparently, I was too busy drinking beer with the Husband and deciding which one of the adorable little babies we were going to steal and keep for ourselves. Haha, not true...Not true that we were actually going to go through with it, however, we did discuss it. I guess that's what happens when you find yourself newlywed and at a birthday party surrounded by babies. Or is that just us????

Regardless, I know they were delicious because the guests were raving and I overheard them. Perhaps she will make them for me another time. Cinco de Mayo??? Job well done, Jackie!


Thursday, April 2, 2009

Bridal Shower Cupcakes

One of my best friends, Jackie, is getting married on June 14th. Yay! I, her matron of honor, along with the other maid of honor and the rest of the bridesmaids threw her a bridal shower this past weekend. It was such a blast and Jackie received so many wonderful gifts, including a lovely mouthful of bunny marshmallows from yours truly. Here is a picture of the ladies who helped plan the shower and Kate Mac.


We set out with the goal to make this shower as Jackie-friendly as possible, so we went with a theme that would be sure to please our lovely red-headed gal. As the invitation (also made by yours truly) promised, we were successful in showering Jackie with love, laughter, and the luck of the Irish--hence all the green in our attire. As coincidence would have it, even Jackie showed up wearing a green dress!

(here she is with her groom-to-be)

Green is Jackie's absolute favorite color and also one of her wedding colors, albeit a slightly less bold version of the color we are all wearing. Another one of the shower related jobs that I bestowed upon myself was to make the cupcakes. Obviously I went with Lemonade cupcakes as it is well known that Jackie loves lemony goodness almost as much as she loves the color green.

I began by making the stand that would hold these cupcakes. I purchased a plain cardboard stand, spray painted it bright yellow (her other wedding color), and outfitted the edges in green ribbon with white polka dots.

I also made a "cupcake topper" for the center cupcake on the display. I bought wooden letters--a "J" for Jackie, a "T" for Tim, her fiance, and a heart for love, obviously. I attached toothpicks to the letters and covered them in light green and gold glitter.


So, here is the recipe I used and then I will show how it looked once it was assembled. Oh, and by the way, I tripled this recipe because I needed to make 6 dozen cupcakes, but as it is printed, the recipe will yield 24 cupcakes.

Ingredients:

1 (6 ounce) can frozen lemonade concentrate, thawed
1 box white cake mix
1 (8 ounce) container of sour cream
3 ounces cream cheese, softened
3 eggs


Directions:

1. Preheat oven to 350 degrees.
2. Remove 2 tablespoons lemonade concentrate from each can and dispose of the rest.
3. Combine remaining concentrate (2 tablespoons), cake mix, sour cream, cream cheese, and eggs.


4. Beat with mixer until well blended.
5. Fill paper muffin cups about 3/4 of the way full.
6. Into the oven and bake for 20 minutes or until a toothpick comes out clean.


7. Allow to cool completely before frosting.

(just try to ignore the bottles of scotch in the background, haha)

I used this recipe for Vanilla Buttercream Frosting to ice these.


Here are some pictures of the whole thing put together:


I must day that I was (and am) pretty darn proud of myself. I received many compliments on how delicious the cupcakes were and one lady even offered to buy my cupcake stand from me. I just let her have it--the stand that is, not a piece of my mind. All in all it was a good, long hard days work all of which was well worth it to see the surprise on my Jackie's face and the tears in her eyes...and no one deserves it more. I love that girl!