Sunday, December 14, 2008

Cheescake Stuffed Strawberries

First of all, allow me to apologize for the inconsistent blogging. I promise that once school is finished (5 more days, woo hoo!), I will be much more consistent. Besides, Tim and I have our annual Christmas cocktail party next weekend, so many a yummy plate will be made. Stay tuned for those yummy recipes....

Anyway, without much further ado, I present one of the best non-baked desserts I have ever made: strawberries stuffed with cheesecake, dipped in creamy milky chocolate, and drizzled in white chocolate, although that part is mostly for effect :)

Unfortunately, it didn't occur to me to take picture of every step. I was in a bit of a rush to prepare something for dinner at Kasey's before the Agora Christmas Party. I did, however, get a picture of the final results and I will provide much details on the directions. It's really quite easier than it sounds.

Here we go:

1. First, hollow out the insides of the strawberries. You can use as many or as little as you want. I used a little less than two cartons as it really isn't strawberry season and the pickins were slim. The easiest way to do this is to use the small side of a melon baller. If you don't have one of those, you can just use a small, sharp knife.

2. As you hollow out the strawberries, lay them face down on a paper towel so that they can drip dry.

3. To make the cheesecake filling combine 12 oz. of cream cheese softened for 30 seconds in the microwave, 3 tablespoons of confectioner's sugar, and 1 teaspoon of vanilla. Combine until it is well mixed.

4. Spoon the mixture into a plastic ziploc bag, seal the bag, and smush all of the mixture into one corner. Snip off a tiny piece of the corner of the bag. Yes, I know this is essentially a pastry bag, but who wants to buy one of those when ziplocs work just as well? Not me!

5. Gently squeeze the mixture out of the corner of the bag into the hollowed out strawberries in a swirling motion allowing the mixture to come out over the top of the strawberry just slightly.

6. Next, melt your chocloate. For the sake of time, I used the dipping chocolate you can buy at the store and simply melt in the microwave, but you can do it however your little heart desires.

7. Dip the bottoms of the strawberries into the melted chocolate and sit them on parchment paper. Place the strawberries in the refrigerator for about 15 minutes so that the chocolate can harden.

8. This next part is purely optional...Melt white chocolate in the same manner as the milk chocolate and use the end of a spoon to drizzle it in a zigzag pattern over the strawberries.

And voila! you're done. Pretty easy, huh? But they look gorgeous and taste just as good.

Here are a couple pictures of the final product!


P.S. I am well aware that my talent as a food photographer is not existent, but you get the idea...

Wednesday, November 12, 2008

Halloween Cupcakes

I realize that I am a little bit late posting this, but you can always keep it in mind for next Halloween. It must be said that these cupcakes might be the greatest ones I have ever made...I am quite proud of myself!

So, I just used a box of cake mix that I bought from the store. Mostly because Jackie requested that the cupcakes be Halloween Funfetti and I have yet to figure out how to make funfetti cake mix from scratch. Also, the real artistry in this project lies not in the baking, but rather in the decorating. That being said:

1) After you remove the cupcakes from the oven, cool them COMPLETELY on a wire cooling rack so the icing doesn't melt once applied.


2) Then gather your decorating items. These cupcakes will eventually be pumpkins, spiders on webs, bloody eyeballs, skulls, and mummies. Therefore, I gathered two cans of icing, sparkly orange sprinkles, pretzel sticks, black gel icing, fake plastic spiders, red gel icing, gummy lifesavers, mini marshmallows, and m&m's.

3) Begin with the pumpkins because they are the easiest. First, use red and yellow food coloring to dye the white icing orange. Then ice a few of your cupcakes with it. Sprinkle the orange cupcakes with the orange sparkly sprinkles and stick a pretzel stick in the middle. They should look like this:


2) Next, make the spider web cupcakes. I was so wrapped up in making these cupcakes that I forgot to take picture of each step, so I am just going to post the final products but I will still explain how to do each one....For the spider webs, I iced the cupcakes with the orange icing, then used the black gel icing to make concentric circles around the cupcake. Then, i used a butter knife and began in the middle drawing the knife outwards pulling the icing with my knife to create the "webbed" look. Finally, I stuck a plastic spider ring into the cupcake to look like a spider resting on his web.


3) Now for the bloody eyeballs, which are my second favorite ones!! For these, I iced the cupcakes with plain white icing. Then I placed a gummy lifesaver in the middle of each cupcake and filled the inner circle in with a dot of the black gel icing.


To make them look bloodshot, just put bloody squiggles around the "eyeball" using the red gel icing. Final product:


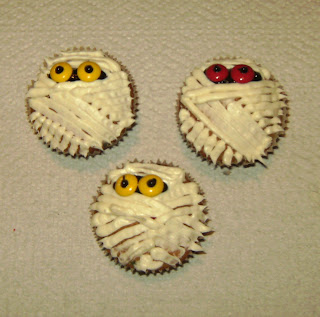
4) Now for my absolute favorite ones, the mummies!!! These were slightly more difficult to make, but I think they turned out the best....First, take a plastic ziploc back and spoon some icing into the bag, pushing it all down into one corner. Then snip of the tip of the corner.


Then, you take an un-iced cupcake and draw straight lines (using the bag of icing) across the cupcake making sure to cross over each other.


Don't forget to leave space for the eyes!

Then, color in the space you left for the eyeballs with the black gel icing, put two m&m's on top of the black icing, and use the icing to create little eyeballs in the candy. VOILA:


5) I also made skull cupcakes, but didn't take any pictures of them! We were in a hurry to leave for a Halloween party and it completely slipped my mind. However, you can see them in these pictures of all the cupcakes together.


Then I used my brand new cupcake tree for the very fist time to display them at the party!!!


And there you have it, spooky cupcakes! Until next Halloween......

Sunday, September 28, 2008

Snickerdoodle Cake

So, last Wednesday was my friend Kasey's 27th Birthday and this is her sort of belated birthday present. There are two things that I know about my friend Kasey: 1) she loves snickerdoodle cookies and 2) she doesn't really much care for cake. And there are two things I know about myself 1) I really like to bake cakes and 2) I don't much care for baking cookies. Besides, apparently her mom's snickerdoodles are so good, that I wouldn't even want to attempt to compete. So I baked this cake in her honor. I know she won't eat it, so Tim and I will eat it and tell her yummy it is! Some birthday present, huh?

Here is my best effort to bring over to my side of the dessert fence.....

One more note about this recipe. While it is true that the recipe calls for a box of pre-made cake mix, DO NOt follow the directions on the box. I like to think if this recipe as somewhere in between from-the-box and baked from scratch. Yes, I use the boxed cake mix as my base, but I add completely different ingredients that Betty Crocker's recipe calls for. She's so overrated anyway.

1. Gather all of the following ingredients: vegetable shortening a.k.a crisco (yum, but don't worry, you don't actually eat any crisco), flour, plain white cake mix, whole milk, real butter, eggs, vanilla extract, and cinnamon.


2. Make sure your oven rack is placed in the center of the over and preheat your oven to 350 degrees.


3. Use the Crisco to grease two 9-inch round cake pans, then dust them with flour. Be sure to shake out the excess flour from the pans.


4. In a mixing bowl, place the cake mix, 8 tablespoons of melted butter, 3 eggs, 1 teaspoon of vanilla, and 2 teaspoons of ground cinnamon.


5. Blend with an electric mixer for about 1 minute, then scrape the sides of the bowl. Beat with mixer for another 2 minutes. The batter should be well combined and fluffy.


6. Divide the batter evenly between the 2 round cake pans that you greased and floured earlier. Smooth out the tops of the batter so that it will cook evenly. Then place the pans in the oven side by side and bake for about 25-30 minutes or until golden brown and springy to the touch.


7. When the cakes have finished cooking, remove them from the oven and place them on wire racks to cool for about 10 minutes.


8. Run a knife around the edge of each pan to loosen the cakes, then invert each cake right-side up onto the wire rack to cool completely--about 30 minutes.


MEANWHILE...make the cinnamom buttercream frosting.

1. Gather the ingredients for the frosting: butter, confectioner's sugar, milk, vanilla extract, and cinnamon (which i left out of the picture by accident)...and this recipe is from scratch :)


2. Place 8 tablespoons of butter at room temperature into a mixing bowl. Beat with an electric mixer until butter is fluffy.


3. Add 3 3/4 cups of confectioner's sugar, 3 tablespoons of milk, 1 teaspoon of vanilla, and 1 teaspoon of cinnamon. Beat with the electric mixer on low for 1 minute. Increase the speed to medium and beat until the icing is light and fluffy. The amount of time is important because the longer you beat the icing, the more air that gets incorporated which makes the icing fluffier. But if you beat it for too long then the batter will be stiff.


Now you can frost the cake!!

1. Ice the top of one of the cakes.


2. Place the second cake right-side up on top of the other.


3. To ice the rest of the cake, start with the top and then move on to the sides, smoothing as you go along. The inside and outside will look like this:


I hope she likes it...
Happy Birthday Lady!!!


Broccoli and Cheddar Soup

So, this is my first recipe entry ever. I apologize in advance (even as I write this) because I already know that it won't turn out as nicely as I had hoped that it would. However, I promise that every time I post a new recipe, I will be better than the last time...especially the pictures. Who knew photographing food could be so difficult?!?!

The following recipe is what I made for dinner tonight. It is Sunday, which means dinner has to be something easy that I can eat whenever and that will also be easy for Tim to heat up when he gets home from band practice. I made this soup because it is SUPER easy (I do have a paper to write tonight, after all) and delicious...I like to think that it rivals that of Panera Bread's soup!

So, here I go.......

1. Gather all of the ingredients. My first mistake: I left the whole milk out of the picture. As my husband would say, I'm such a newbie (i think that's how you spell it???) Anyway, I have gathered REAL butter (i prefer the half sticks because i think they're cute), a cooking onion, ground white pepper, frozen chopped broccoli, chicken broth, garlic, flour, whole milk, shredded sharp cheddar cheese, and salt.


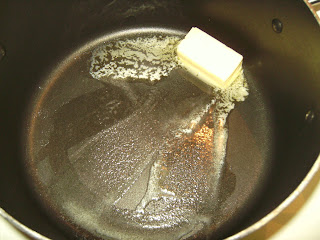
2. Melt a 1/4 cup of butter over medium heat in stockpot.


3. Dice 1 small cooking onion and cook in the butter until softened.


4. Add 2 cloves of garlic and 1/2 teaspoon of white pepper; cook for about 1 minute.


5. Stir in 16 oz. of frozen broccoli.


6. Stir in one quart of chicken broth.


7. Bring to a boil and simmer until broccoli is tender, 10 to 15 minutes.


MEANWHILE.......

8. Whisk 1/2 cup of flour into 1 1/2 cups of whole milk until dissolved.


9. Once the soup has finished simmering, stir the flour/milk mixture into the soup--stirring frequently until the soup has thickened.


10. Reduce heat to medium-low and stir in 8 oz. of shredded sharp cheddar cheese until it has melted and the soup is heated through.


11. Season with salt to taste and when you are finished your soup should look something like this (although you might have a different spoon):


I suggest pairing it with a sandwich for a yummy meal. I made a BLT and Tim will most likely have a roast beef sandwich. In case you were wondering this is what i ate for dinner tonight....mmmmmmmm :)


Broccoli and Cheddar Soup (for the visually impaired)

Ingredients
1/4 cup real butter
1 medium onion, diced
2 cloves of garlic
1/2 tsp. white pepper
16 oz. frozen chopped broccoli
1 quart chicken broth
1/2 cup flour
1 1/2 cups whole milk
8 oz. shredded sharp cheddar cheese
salt to taste

Directions
1. Melt butter over medium heat in stockpot. Cook onion in butter until softened. Add garlic and pepper; cook for 1 minute then stir in broccoli and stir in chicken broth. Bring to a boil and simmer until broccoli is tender, 10 to 15 minutes.

2. Meanwhile, whisk flour into milk until dissolved. Stir into soup frequently until thickened. Reduce heat and stir in cheese until melted and heated through.

3. Season with salt to taste.

ENJOY!!!