Thursday, January 29, 2009

(Lo Cal) Banana Muffins

...well sort of...

As I mentioned earlier, I am on a diet. This does not change the fact that I still crave something sweet and dessert-like every now and again. More like all the time, but that is neither here nor there. Anyway, I was going to make applesauce brownies, but then I decided that banana muffins sounded way better. The thing about these muffins is that they look nothing like my previous experiences consuming banana muffins--instead they look like mushed bananas both before and after baking. Is it just me or are banana muffins supposed to be a brownish color???

Regardless, these are yummy, super easy, and 110 calories per muffin. Of course, this depends on the size of the particular muffin, but my batch made 10 muffins, which means each muffin is 110 calories, give or take.


What's even better is that you could make these muffins even healthier by using a sugar substitute and whole grain flour. I had neither of these in my kitchen, so I went for the yummier yet still healthy version....best decision i made all day.


So, obviously begin by gathering your ingredients:

  • 2 bananas
  • 1 tbsp. melted butter or margarine
  • 1/2 cup of sugar
  • 1 tsp. of vanilla extract (you can use rum extract or whatever else you have sitting around)
  • 1 tsp. baking powder
  • 1 egg
  • 2 tbsp. of milk
  • 3/4 cup of flour
***to make these even healthier, substitute the 1/2 cup sugar for 1 full cup of splenda and use whole wheat flour***

1. Place the bananas into a bowl and mush them up.

(eeeewwww, how icky does that look???)

2. Add the margarine, vanilla, sugar, baking powder, egg, and milk to the mushy bananas.


3. After mixing those ingredients together, add in the flour and mix well.


4. Finally fill your muffin pan with the batter. You can either use paper cup liners like i did, or you could always grease and flour the pan...muffin cups are way easier!


5. Bake them at 350 degrees for about 20 minutes or until you can stick a toothpick in the center and it comes out clean.

I must warn you that you should definitely check them with the toothpick trick after 20 minutes because they look exactly the same coming out of the oven as they did going in. Proof:


These are fully cooked.

And I hope they satisfy the Missi's and Josh's of the world.

Wednesday, January 28, 2009

White Chocolate Cake with Raspberry Filling

As most of you know, Tim just started a new job. Unfortunately for me, this new jobs involves some traveling. In early January he was gone for 12 days between Miami and LA. In order to keep myself busy, I did A LOT of baking. I started with a chocolate chip layer cake of which I have no pictures to share. Then I made 4 dozen m&m cookies and mailed them to Alee in Seattle. Then I made the glorious cake that I am about to share with you.

This cake was beyond decadent and a very pleasant surprise for Tim upon returning home from his trip. Admittedly, the decorating could use a little work; I am not the best cake icer in the world as this was perhaps the most difficult cake I have ever tried to ice. The raspberry jam kept gooing out the sides and turning the white chocolate icing into a pink color, which needless to say was not the desired effect. I tried to distract from this by compensating for it with fresh raspberries and white chocolate curls.

There is someone special to whom I owe tremendous thanks in her assistance with this recipe. I received her as a Christmas gift from Mom Ford and I love her like she is my child. Readers, meet Pearl:


One final note...I am on a diet. Good for me, yes, but the baking of cakes will have to stop until I reach my 8 pound goal. However, once this happens (if it happens) I plan on stepping up the blog and focusing mostly on delicious cupcake recipes. Stay tuned.... So, here's the yummiest cake I ever did make:

1. Gather all of the ingredients you will need for the cake. (flour, sugar, salt, eggs, butter, vanilla, white chocolate, half and half, baking powder, and salt)


2. Begin by separating the yolks from the whites of 4 eggs, but save both components. Allow the egg whites to sit at room temperature for about 30 minutes.


3. In a small mixing bowl combine 1 3/4 cups of flour, 2 tsp. baking powder, and 1/4 tsp. of salt. Whisk these ingredients together and then set the mixture aside.


4. Melt 3 ounces of the white chocolate baking bar (broken down into smaller chunks) with 1/4 cup of the half and half in a saucepan over very low heat, stirring constantly just until the chocolate begins to melt. Remove from heat and continue to stir until the chocolate is completely melted. Stir in 1/2 cup of half and half and allow mixture to cool.


5. With your version of Pearl, beat 1/3 cup of butter for about 30 seconds and then add 1 cup of sugar and 1 tsp. vanilla. Then add the 4 egg yolks one at a time.


6. Alternately add the flour mixture and the white chocolate mixture, beating just until combined.


7. In a separate mixing bowl beat the 4 egg whites with a hand mixer until stiff peaks begin to form. This will take a few minutes and look something like this when finished, although the picture can't really capture the peaks that you are looking for.


8. Very gently fold the egg whites into the batter.


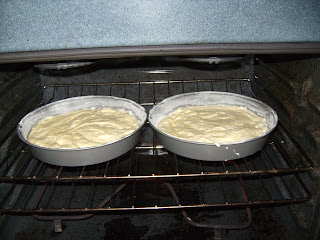
9. Pour the cake batter into two 8 or 9 inch pans and bake at 350 degrees for 25-30 minutes.

(nevermind the gorgeous insides of my oven...)

Meanwhile....

Prepare the icing...

1. Gather your ingredients: milk, white chocolate baking bar, vanilla, butter, salt, powdered sugar, and whipped cream.


2. Melt 4 1/2 ounces of the white chocolate (broken into chunks) over a double boiler. Then stir it until smooth and allow to cool to room temperature.


3. Sift 1 3/4 cup of powdered sugar into a mixing bowl.


4. Add 1/4 cup of milk, 1/2 tsp. vanilla extract, 6 tbsp. unsalted butter, and a pinch of salt. Beat until combined.


5. You could stop here and have delicious icing, but I like my icing a bit more fluffy, so i added about 3/4 cup of whipped cream. After mixing the icing to your liking refrigerate it for about 30 minutes.

Now to put it all together...

After the cakes have COMPLETELY cooled, place the bottom layer into your cake plate. Cover it with about 1/3 cup of seedless raspberry jam and a thin layer of the white chocolate icing. Place the top layer on top of the cake and frost the entire thing with the icing.

To decorate the cake, I used fresh raspberries around the bottom and curls of white chocolate all over the top. To make the curls, take a vegetable peeler to the remaining 1/2 ounce of white chocolate and let it fall where it may.


Alas, I present my White Chocolate Cake with Raspberry Filling:


***As a reminder, do not judge my cake by appearance alone, but rather by how good you can only imagine it tasted....Absolutely Delicious!