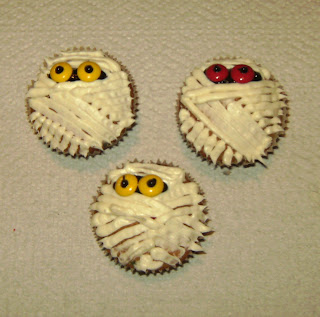
So, I just used a box of cake mix that I bought from the store. Mostly because Jackie requested that the cupcakes be Halloween Funfetti and I have yet to figure out how to make funfetti cake mix from scratch. Also, the real artistry in this project lies not in the baking, but rather in the decorating. That being said:
1) After you remove the cupcakes from the oven, cool them COMPLETELY on a wire cooling rack so the icing doesn't melt once applied.

2) Then gather your decorating items. These cupcakes will eventually be pumpkins, spiders on webs, bloody eyeballs, skulls, and mummies. Therefore, I gathered two cans of icing, sparkly orange sprinkles, pretzel sticks, black gel icing, fake plastic spiders, red gel icing, gummy lifesavers, mini marshmallows, and m&m's.
 3) Begin with the pumpkins because they are the easiest. First, use red and yellow food coloring to dye the white icing orange. Then ice a few of your cupcakes with it. Sprinkle the orange cupcakes with the orange sparkly sprinkles and stick a pretzel stick in the middle. They should look like this:
2) Next, make the spider web cupcakes. I was so wrapped up in making these cupcakes that I forgot to take picture of each step, so I am just going to post the final products but I will still explain how to do each one....For the spider webs, I iced the cupcakes with the orange icing, then used the black gel icing to make concentric circles around the cupcake. Then, i used a butter knife and began in the middle drawing the knife outwards pulling the icing with my knife to create the "webbed" look. Finally, I stuck a plastic spider ring into the cupcake to look like a spider resting on his web.

3) Now for the bloody eyeballs, which are my second favorite ones!! For these, I iced the cupcakes with plain white icing. Then I placed a gummy lifesaver in the middle of each cupcake and filled the inner circle in with a dot of the black gel icing.

To make them look bloodshot, just put bloody squiggles around the "eyeball" using the red gel icing. Final product:

4) Now for my absolute favorite ones, the mummies!!! These were slightly more difficult to make, but I think they turned out the best....First, take a plastic ziploc back and spoon some icing into the bag, pushing it all down into one corner. Then snip of the tip of the corner.

Then, you take an un-iced cupcake and draw straight lines (using the bag of icing) across the cupcake making sure to cross over each other.

Don't forget to leave space for the eyes!
 Then, color in the space you left for the eyeballs with the black gel icing, put two m&m's on top of the black icing, and use the icing to create little eyeballs in the candy. VOILA:
5) I also made skull cupcakes, but didn't take any pictures of them! We were in a hurry to leave for a Halloween party and it completely slipped my mind. However, you can see them in these pictures of all the cupcakes together.


Then I used my brand new cupcake tree for the very fist time to display them at the party!!!


And there you have it, spooky cupcakes! Until next Halloween......


