Wednesday, February 25, 2009

Jelly Doughnut Cupcakes

from Coconut and Lime


I don't eat doughnuts regularly, but when I do I tend to partake in the kind that have jelly on the inside....especially of the munchkin variety. These were pretty good--I would rate them a 6.5 out of 10. The cake part was very different than I am used to. It was very moist and actually kind of tasted like a doughnut. The husband told me that they taste exactly like jelly doughnuts. Now whether he was being honest or just boosting my confidence remains to be seen. You make them and let me know!

Ingredients:

1 cup flour
1/2 cup brown sugar
½ cup milk
1/4 cup butter, at room temperature
1 egg, at room temperature
1 teaspoon vanilla
1 teaspoon baking powder
½ teaspoon lemon zest
1/4 teaspoon salt

good quality red jelly (any flavor--i used raspberry)
powdered sugar ( i used regular sugar)

Directions:

1. Preheat the oven to 350.
2. Grease and flour or line 8 wells in a cupcake pan.
3. In a large bowl, cream together butter and sugar until light and fluffy.
4. Add egg, vanilla, zest and milk beat well. Add the flour, baking powder and salt. Beat until the batter is light and fluffy.
5. Fill each well 2/3 of the way filled.
6. Bake approximately 15 minutes or until a toothpick inserted in the middle of cupcake comes out clean.
7. Cool on a wire rack and take a small corer, knife or melon baller and scoop out some of the center of the cupcake.
8. Fill with jelly (I just spooned it in).
9. Sprinkle with sugar.

Tuesday, February 24, 2009

My Darling Friend and Her Darling Blog

A Dining Darling

One of
my very best friends has a blog of her very own. I will allow her to introduce herself:


I’m not a Food Expert, I just like to eat it. I also like to read about food, imagine great new recipes I can cook up, restaurants I need to visit, and fantasize about the kitchen I would have if I won the lottery. You better believe that there would be a Cuisinart Stand Mixer in that kitchen, and if they had one in pink, even better!

I am unabashed about my love of all things cupcakes, tea, and wine. I like red wine the most and am lucky in that it doesn’t turn my teeth and lips purple. If you try to call me at 10:00pm on Wednesdays, when Top Chef is on, I will most likely not answer my phone. I love comfort foods, and especially like finding lowfat alternatives for comfort foods.

Come eat with me!

So be sure to scope out her blog and follow her as she discovers the wonders of the food culture in Baltimore...

Lemon Sqaures


Normally, I am not a huge fan of lemon flavored things, but I have been a lover of lemon squares for as long as I can remember. However, I have never had them from scratch, my mom always went the boxed route. So, the other night I got the desire to bake something and as it turned out, lemon squares were the perfect choice for two reasons: 1) I already had all the ingredients in my kitchen and 2) I would be seeing my Jackie the next day and if anyone loves lemony treats, it's Jackie...

Speaking of Jackie...she alerted me the other day that she has a recipe to put up on my blog. So keep an eye out as she will be my first official guest blogger.

Now onto the luscious lemon squares....

Ingredients:

1 3/4 cups all-purpose flour, divided
1 1/2 cup white sugar, divided
3/4 teaspoon salt, divided
1/2 cup cold butter, cubed
4 eggs
Zest and juice of 2 lemons, separated
powdered sugar

Directions:

1. Preheat the oven to 350 degrees F. In a bowl, combine 1 1/2 cups flour, 1/4 cup white sugar, and 1/4 teaspoon of salt.

2. Add the cubed butter to the flour and using your hands, combine the butter with the flour until you’re left with a crumbly mixture.


3. Press this mixture into a 9×13 pan lined with foil and sprayed with cooking spray.


4. Bake the crust for 15-20 minutes or until just turning golden on the edges.

Meanwhile...

5. In a new bowl, combine the zest of 2 lemons and 1 1/4 cups of white sugar and rub them together until the zest is incorporated into the sugar.

6. Whisk or beat in the eggs and add the lemon juice. Add 1/4 cup of flour and 1/2 teaspoon of salt and whisk them in.


Once the crust has finished baking...

6. Pour the lemon filling over the hot crust and bake for 20-25 minutes or until the top is set and doesn’t wiggle.


7. Remove the lemon bars from the oven and allow to cool COMPLETELY before sprinkling with powdered sugar and cutting.


These were absolutely delicious!! And I kind of wish I had one right now.

P.S. Did you notice that picture taking skills have improved? Well, not entirely. More like my photo touch-up skills have improved, especially for the pictures of the final product....mmmm, i'm salivating...


Thursday, February 19, 2009

Valentine's Day Surprises

It seems that I have found myself with A LOT of free time on my hands lately. It's been almost 2 months since I graduated and I have yet to find a job--not even so much as an interview. I have turned to baking in order to distract myself from the unfortunate circumstances. I keep on applying and I keep on baking...I have all the time in the world.

Valentine's Day was this past weekend and I decided to make special treats for some of my lovely lady friends. Two of these ladies live on the West Coast so they only received cookies, but the ladies who live in my area received cookies AND cupcakes. Then I gave Tim the leftovers to take into work. And everyone got a handmade card (well, except for Tim's co-workers). I spent last Tuesday baking 2 dozen cupcakes and 9 dozen cookies.
I present you with the fruits (sweets) of my labors:

Valentine Cupcakes:

Basically, I made a standard white cake mix. The twist, however, is that I added 2 tbsp. of sprinkles because I LOVE funfetti cake!!! Then I iced and decorated them in a special Valentine's way:

P.S. I found the cutest cupcake boxes in the world, but more on that later...


Valentine Sugar Cookies:

I'll be the first to admit that cookies are not my forte, but I decided to give them a whirl anyway. They aren't my best work. They were supposed to be heart shaped, but I got in a fight with the rolling pin and decided just to plop them on the baking sheet and go from there.

Ingredients:

2 1/2 cups flour
1/4 tsp. baking powder
1 cup butter, softened
3/4 cup granulated sugar
2 eggs
1 egg yolk
1/4 tsp. vanilla

1. Preheat oven to 375 degrees.
2. In a bowl, stir together flour and baking powder. Set aside.
3. In a larger bowl, cream the butter. Add sugar and beat again until well combined. Then beat in eggs, egg yolk, and vanilla. Beat in the flour mixture.
4. Refrigerate dough for 3 hours.
5. Drop onto a baking sheet and bake for 8-10 minutes or until slightly browned.
6. Allow them to cool completely and then ice them.

Icing:

2 1/2 cups of confectioners sugar
3 or 4 tablespoons of water
few drops of food coloring

1. Mix the sugar and water together until desired consistency is reached.
2. Spoon or spread (depending on consistency) over completely cooled cookies.

White Chocolate Raspberry Cookies


Ingredients:

12 oz. white chocolate chips
1/2 cup butter
1 cup sugar
1 tsp. baking soda
1/4 tsp. salt
2 eggs
2 3/4 cups all-purpose flour
seedless raspberry jam
1/2 tsp. shortening

Directions:

1. Preheat oven to 375 degrees. Grease a cookie sheet. Set aside. In a heavy small saucepan melt 4 ounces of the white chocolate chips over low heat, stirring constantly. Cool.

2. In a large mixing bowl beat butter with an electric mixer about 30 seconds or until softened. Add the sugar, baking soda, and salt. Beat until combined. Beat in eggs and melted white chocolate chips until combined. Beat in as much of the flour as you can with the mixer. Stir in any remaining flour with a wooden spoon. Stir in the 4 more ounces of white chocolate chips.

3. Drop dough from a rounded teaspoon 2 inches apart on the prepared cookie sheet. Bake in preheated oven for 7 to 9 minutes or until cookies are lightly browned around edges. Cool on cookie sheet for 1 minute. Transfer cookies to wire racks. Cool completely.

4. Melt the raspberry jam in a small saucepan over low heat. Spoon about 1/2 teaspoon of jam atop each cookie. In a heavy, small saucepan combine the 3 ounces white baking bar and shortening. Melt over low heat, stirring constantly. Drizzle each cookie with some of the melted mixture. If necessary, refrigerate cookies about 15 minutes or until chocolate mixture is firm.

Makes about 4 dozen cookies.


Now here are the little packages I put together for my ladies:

And these are the cards I made :)


All in all, I think everyone enjoyed them...except Kate because she still hasn't gotten hers. All in good time, even though that makes for stale cupcakes, haha!!


Thursday, January 29, 2009

(Lo Cal) Banana Muffins

...well sort of...

As I mentioned earlier, I am on a diet. This does not change the fact that I still crave something sweet and dessert-like every now and again. More like all the time, but that is neither here nor there. Anyway, I was going to make applesauce brownies, but then I decided that banana muffins sounded way better. The thing about these muffins is that they look nothing like my previous experiences consuming banana muffins--instead they look like mushed bananas both before and after baking. Is it just me or are banana muffins supposed to be a brownish color???

Regardless, these are yummy, super easy, and 110 calories per muffin. Of course, this depends on the size of the particular muffin, but my batch made 10 muffins, which means each muffin is 110 calories, give or take.


What's even better is that you could make these muffins even healthier by using a sugar substitute and whole grain flour. I had neither of these in my kitchen, so I went for the yummier yet still healthy version....best decision i made all day.


So, obviously begin by gathering your ingredients:

  • 2 bananas
  • 1 tbsp. melted butter or margarine
  • 1/2 cup of sugar
  • 1 tsp. of vanilla extract (you can use rum extract or whatever else you have sitting around)
  • 1 tsp. baking powder
  • 1 egg
  • 2 tbsp. of milk
  • 3/4 cup of flour
***to make these even healthier, substitute the 1/2 cup sugar for 1 full cup of splenda and use whole wheat flour***

1. Place the bananas into a bowl and mush them up.

(eeeewwww, how icky does that look???)

2. Add the margarine, vanilla, sugar, baking powder, egg, and milk to the mushy bananas.


3. After mixing those ingredients together, add in the flour and mix well.


4. Finally fill your muffin pan with the batter. You can either use paper cup liners like i did, or you could always grease and flour the pan...muffin cups are way easier!


5. Bake them at 350 degrees for about 20 minutes or until you can stick a toothpick in the center and it comes out clean.

I must warn you that you should definitely check them with the toothpick trick after 20 minutes because they look exactly the same coming out of the oven as they did going in. Proof:


These are fully cooked.

And I hope they satisfy the Missi's and Josh's of the world.

Wednesday, January 28, 2009

White Chocolate Cake with Raspberry Filling

As most of you know, Tim just started a new job. Unfortunately for me, this new jobs involves some traveling. In early January he was gone for 12 days between Miami and LA. In order to keep myself busy, I did A LOT of baking. I started with a chocolate chip layer cake of which I have no pictures to share. Then I made 4 dozen m&m cookies and mailed them to Alee in Seattle. Then I made the glorious cake that I am about to share with you.

This cake was beyond decadent and a very pleasant surprise for Tim upon returning home from his trip. Admittedly, the decorating could use a little work; I am not the best cake icer in the world as this was perhaps the most difficult cake I have ever tried to ice. The raspberry jam kept gooing out the sides and turning the white chocolate icing into a pink color, which needless to say was not the desired effect. I tried to distract from this by compensating for it with fresh raspberries and white chocolate curls.

There is someone special to whom I owe tremendous thanks in her assistance with this recipe. I received her as a Christmas gift from Mom Ford and I love her like she is my child. Readers, meet Pearl:


One final note...I am on a diet. Good for me, yes, but the baking of cakes will have to stop until I reach my 8 pound goal. However, once this happens (if it happens) I plan on stepping up the blog and focusing mostly on delicious cupcake recipes. Stay tuned.... So, here's the yummiest cake I ever did make:

1. Gather all of the ingredients you will need for the cake. (flour, sugar, salt, eggs, butter, vanilla, white chocolate, half and half, baking powder, and salt)


2. Begin by separating the yolks from the whites of 4 eggs, but save both components. Allow the egg whites to sit at room temperature for about 30 minutes.


3. In a small mixing bowl combine 1 3/4 cups of flour, 2 tsp. baking powder, and 1/4 tsp. of salt. Whisk these ingredients together and then set the mixture aside.


4. Melt 3 ounces of the white chocolate baking bar (broken down into smaller chunks) with 1/4 cup of the half and half in a saucepan over very low heat, stirring constantly just until the chocolate begins to melt. Remove from heat and continue to stir until the chocolate is completely melted. Stir in 1/2 cup of half and half and allow mixture to cool.


5. With your version of Pearl, beat 1/3 cup of butter for about 30 seconds and then add 1 cup of sugar and 1 tsp. vanilla. Then add the 4 egg yolks one at a time.


6. Alternately add the flour mixture and the white chocolate mixture, beating just until combined.


7. In a separate mixing bowl beat the 4 egg whites with a hand mixer until stiff peaks begin to form. This will take a few minutes and look something like this when finished, although the picture can't really capture the peaks that you are looking for.


8. Very gently fold the egg whites into the batter.


9. Pour the cake batter into two 8 or 9 inch pans and bake at 350 degrees for 25-30 minutes.

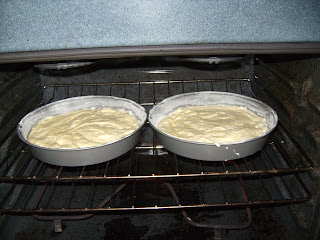
(nevermind the gorgeous insides of my oven...)

Meanwhile....

Prepare the icing...

1. Gather your ingredients: milk, white chocolate baking bar, vanilla, butter, salt, powdered sugar, and whipped cream.


2. Melt 4 1/2 ounces of the white chocolate (broken into chunks) over a double boiler. Then stir it until smooth and allow to cool to room temperature.


3. Sift 1 3/4 cup of powdered sugar into a mixing bowl.


4. Add 1/4 cup of milk, 1/2 tsp. vanilla extract, 6 tbsp. unsalted butter, and a pinch of salt. Beat until combined.


5. You could stop here and have delicious icing, but I like my icing a bit more fluffy, so i added about 3/4 cup of whipped cream. After mixing the icing to your liking refrigerate it for about 30 minutes.

Now to put it all together...

After the cakes have COMPLETELY cooled, place the bottom layer into your cake plate. Cover it with about 1/3 cup of seedless raspberry jam and a thin layer of the white chocolate icing. Place the top layer on top of the cake and frost the entire thing with the icing.

To decorate the cake, I used fresh raspberries around the bottom and curls of white chocolate all over the top. To make the curls, take a vegetable peeler to the remaining 1/2 ounce of white chocolate and let it fall where it may.


Alas, I present my White Chocolate Cake with Raspberry Filling:


***As a reminder, do not judge my cake by appearance alone, but rather by how good you can only imagine it tasted....Absolutely Delicious!


Sunday, December 14, 2008

Cheescake Stuffed Strawberries

First of all, allow me to apologize for the inconsistent blogging. I promise that once school is finished (5 more days, woo hoo!), I will be much more consistent. Besides, Tim and I have our annual Christmas cocktail party next weekend, so many a yummy plate will be made. Stay tuned for those yummy recipes....

Anyway, without much further ado, I present one of the best non-baked desserts I have ever made: strawberries stuffed with cheesecake, dipped in creamy milky chocolate, and drizzled in white chocolate, although that part is mostly for effect :)

Unfortunately, it didn't occur to me to take picture of every step. I was in a bit of a rush to prepare something for dinner at Kasey's before the Agora Christmas Party. I did, however, get a picture of the final results and I will provide much details on the directions. It's really quite easier than it sounds.

Here we go:

1. First, hollow out the insides of the strawberries. You can use as many or as little as you want. I used a little less than two cartons as it really isn't strawberry season and the pickins were slim. The easiest way to do this is to use the small side of a melon baller. If you don't have one of those, you can just use a small, sharp knife.

2. As you hollow out the strawberries, lay them face down on a paper towel so that they can drip dry.

3. To make the cheesecake filling combine 12 oz. of cream cheese softened for 30 seconds in the microwave, 3 tablespoons of confectioner's sugar, and 1 teaspoon of vanilla. Combine until it is well mixed.

4. Spoon the mixture into a plastic ziploc bag, seal the bag, and smush all of the mixture into one corner. Snip off a tiny piece of the corner of the bag. Yes, I know this is essentially a pastry bag, but who wants to buy one of those when ziplocs work just as well? Not me!

5. Gently squeeze the mixture out of the corner of the bag into the hollowed out strawberries in a swirling motion allowing the mixture to come out over the top of the strawberry just slightly.

6. Next, melt your chocloate. For the sake of time, I used the dipping chocolate you can buy at the store and simply melt in the microwave, but you can do it however your little heart desires.

7. Dip the bottoms of the strawberries into the melted chocolate and sit them on parchment paper. Place the strawberries in the refrigerator for about 15 minutes so that the chocolate can harden.

8. This next part is purely optional...Melt white chocolate in the same manner as the milk chocolate and use the end of a spoon to drizzle it in a zigzag pattern over the strawberries.

And voila! you're done. Pretty easy, huh? But they look gorgeous and taste just as good.

Here are a couple pictures of the final product!


P.S. I am well aware that my talent as a food photographer is not existent, but you get the idea...

Wednesday, November 12, 2008

Halloween Cupcakes

I realize that I am a little bit late posting this, but you can always keep it in mind for next Halloween. It must be said that these cupcakes might be the greatest ones I have ever made...I am quite proud of myself!

So, I just used a box of cake mix that I bought from the store. Mostly because Jackie requested that the cupcakes be Halloween Funfetti and I have yet to figure out how to make funfetti cake mix from scratch. Also, the real artistry in this project lies not in the baking, but rather in the decorating. That being said:

1) After you remove the cupcakes from the oven, cool them COMPLETELY on a wire cooling rack so the icing doesn't melt once applied.


2) Then gather your decorating items. These cupcakes will eventually be pumpkins, spiders on webs, bloody eyeballs, skulls, and mummies. Therefore, I gathered two cans of icing, sparkly orange sprinkles, pretzel sticks, black gel icing, fake plastic spiders, red gel icing, gummy lifesavers, mini marshmallows, and m&m's.

3) Begin with the pumpkins because they are the easiest. First, use red and yellow food coloring to dye the white icing orange. Then ice a few of your cupcakes with it. Sprinkle the orange cupcakes with the orange sparkly sprinkles and stick a pretzel stick in the middle. They should look like this:


2) Next, make the spider web cupcakes. I was so wrapped up in making these cupcakes that I forgot to take picture of each step, so I am just going to post the final products but I will still explain how to do each one....For the spider webs, I iced the cupcakes with the orange icing, then used the black gel icing to make concentric circles around the cupcake. Then, i used a butter knife and began in the middle drawing the knife outwards pulling the icing with my knife to create the "webbed" look. Finally, I stuck a plastic spider ring into the cupcake to look like a spider resting on his web.


3) Now for the bloody eyeballs, which are my second favorite ones!! For these, I iced the cupcakes with plain white icing. Then I placed a gummy lifesaver in the middle of each cupcake and filled the inner circle in with a dot of the black gel icing.


To make them look bloodshot, just put bloody squiggles around the "eyeball" using the red gel icing. Final product:


4) Now for my absolute favorite ones, the mummies!!! These were slightly more difficult to make, but I think they turned out the best....First, take a plastic ziploc back and spoon some icing into the bag, pushing it all down into one corner. Then snip of the tip of the corner.


Then, you take an un-iced cupcake and draw straight lines (using the bag of icing) across the cupcake making sure to cross over each other.


Don't forget to leave space for the eyes!

Then, color in the space you left for the eyeballs with the black gel icing, put two m&m's on top of the black icing, and use the icing to create little eyeballs in the candy. VOILA:


5) I also made skull cupcakes, but didn't take any pictures of them! We were in a hurry to leave for a Halloween party and it completely slipped my mind. However, you can see them in these pictures of all the cupcakes together.


Then I used my brand new cupcake tree for the very fist time to display them at the party!!!


And there you have it, spooky cupcakes! Until next Halloween......